Showing posts with label cakes. Show all posts

Saturday, August 25, 2012

Royal Birthday Bash


One day out of the blue, my son decided that he was a king. Naturally, this meant that his baby sister was the queen, my husband became "Prince Daddy", and I was granted the title of "Princess Mommy".  We live in "the blue castle". His flip flops became his official "king shoes". The list goes on and on.

The Royal Family
Because their birthdays are only 5 days apart, I decided to throw a double birthday party for my little  king and queen. Here is how I threw a "Kimperfect" (a.k.a. cute & on a budget) birthday party for 13 kids and 18 adults.

Invitations
Decorations
Cupcakes
Favors/Activities
Kimperfect Notes

Invitations: 

I usually love sending out cute, printed invitations because you'll have something to stick in the scrapbook. I fought this instinct and went with an evite. I chose the princess crown template & here is how I worded the invitation:


Hear ye, hear ye! 

The honor of your presence is requested at the royal birthday festivities for King Jacob V and Queen Emily II.
Join us as we slay a dragon, rescue the King's treasure, and partake in a royal feast.  Your little ladies are welcome to wear their favorite princess dresses. Armor will be provided for the knights.

Decorations:
I looked for a very long time for some high quality royal birthday decorations. Most princess stuff, unless you're going with a true Disney theme, is really tacky. The knight stuff is also pretty lame. I really didn't feel like making everything like I did last year, so I was willing to pay a little more for the convenience factor. 

Then I hit the jack-pot: Meri Meri. She had two themes that went very well together: "Calling All Princesses" and "Brave Knights". After a lot of comparison shopping, I found that the best deal was the direct Meri Meri website and I bought (for each theme): garlands, small cake plates, cupcake kits, party hats, and the princess castle centerpiece. This got a little pricey, but I found a coupon code for 25% my order on www.retailmenot.com . I think with shipping, it was $75. Yikes! But remember, I was buying for two kids. 

Garlands: 
I used my Circuit machine to add their names and ages to the banners. Emily's was easy- I just glued the letters or numbers to the garland. Jacob's garland was very nice, but I had to cut card stock backings for the letters (which I double matted). I added balloons to cover the spot where I used a nail to hang the banners in the corners of my dining room.
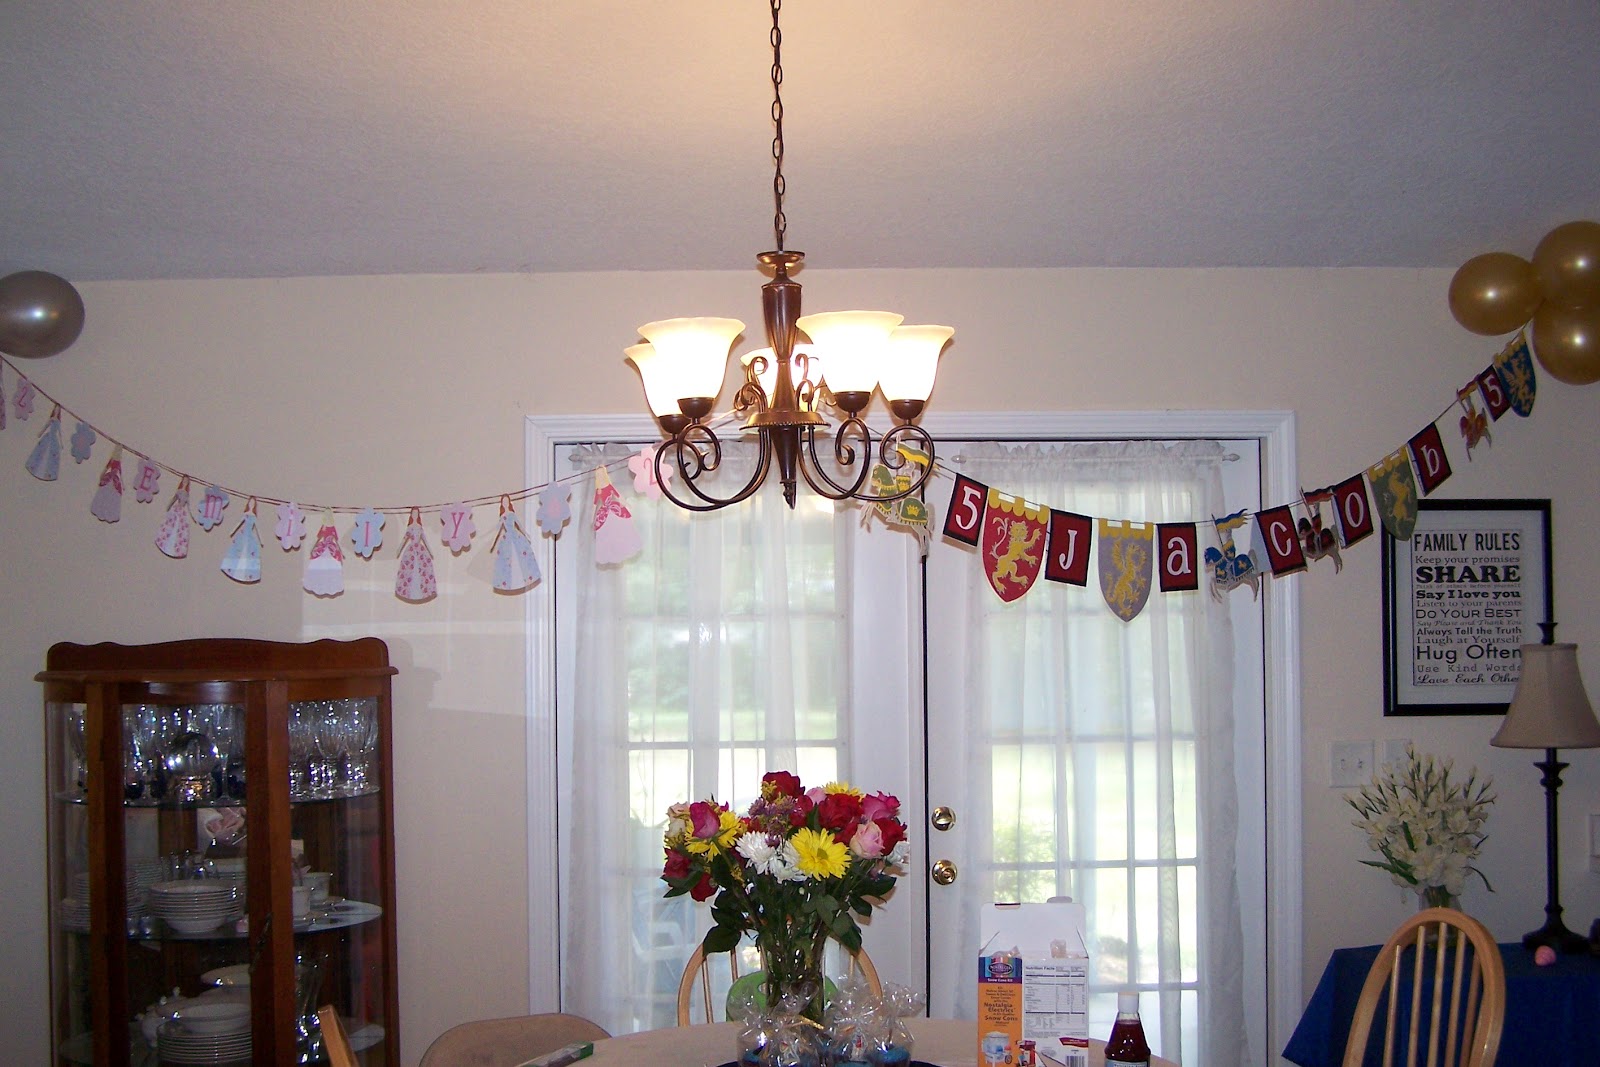
The full view of the banners. 

Emily's banner

Jacob's banner

Cupcakes:

I love to make extravagant cakes for people. But the more I looked into creating a giant castle cake, the more I began dreading it. Wilton sells a castle cake kit that looks great, but got very poor reviews. So I decided to go the "easy route" and make cupcakes. Hahaha. Easy. 

My original plan was to get a Publix sheet cake and put the castle on top of it, surrounded by the cupcakes made from the cupcake kits (they have princesses and knight toppers). But the more I played around with it, the more I realized that I needed cupcake towers. 


Wilton makes cardboard toppers for $5.99 that you can decorate. 
For both towers, I used scrapbook paper to cover the tiers & ribbon to cover the edges. I set the castle on a cake plate to give it some height and covered it in pink fabric ($2 from Walmart). 
I found 2 amazing recipes on Pinterest for the cupcakes. The knight cupcakes are Andes Mint cupcakes and the Princess cupcakes are white wedding cake cupcakes with vanilla butter cream frosting. These were totally from scratch cupcakes, so the cost of making them was fairly high. I didn't realize it was going to cost so much, but I probably spent at least $50 in ingredients. I made all of the cupcakes the week of the party and once they had cooled, I frosted them and froze them until the party. 

I also gave out extra cupcakes as favors. To package them, I used tongs to put the frozen (so that the icing doesn't smear) cupcakes into little plastic cups (dollar store!). Then you open up a cellophane bag and roll it down (like you're rolling the sleeves on a sweater) before dropping the cup into the bag. Finish it off by tying it with a ribbon and (if you had more time than I did) a "thank you for coming" tag. 

Favors/Activities:


The girls decorated magic mirrors. I bought pink double-sided stand mirrors from the dollar store. I cut out card stock circles ahead of time to hot glue to one side of the mirrors after they were decorated with markers, crayons, glitter, foam stickers, and princess stickers. 

If I could do it again, I probably would have decorated a hand mirror, but these were cute, too. I wanted a craft that wouldn't be thrown away or destroyed as quickly as a foam crown or something.


Each of the boys decorated a knight's shield. I made 8 shields for less than $15- that is better than Oriental Trading. They were easy to make!  I just cut out shields from foam boards from the dollar store, painted them with silver paint ($0.50 at Michael's), rolled the sides in white glue and glitter.

To decorate, I bought knight stickers and red duct tape (to make a cross). And I used a small piece of velco on the back as a handle. (I'll post a separate tutorial soon.)


   Slaying the dragon (pinata) was King Jacob's favorite part of the party.  This pinata was ridiculously hard to break! Prince Daddy ended up smashing it. 

It was also kind of girly looking. To make it look more fierce, I added some tissue paper flames. 


Inevitable jousting matches. I bought the foam swords at the Dollar Store and Michael's.


I bought a Discovery Kids cardboard castle at Burlington Coat Factory. The kids had a get time playing in a "real" castle. It had towers, a drawbridge door, etc... Totally worth $15.00. 


Kimperfect notes:

* For the menu, we served salad, a veggie tray, chips and salsa, hummus, Chick-Fil-A nuggets, Pepperidge Farm Chessman cookies (which looked really cute with the theme), and Bugles. I ran out of time & motivation to add cute signs to the food. If I could do it over again, I would have called the bugles "Dragon Toenails", the nuggets "King Jacob's golden nuggets", "non-poisoned" apple juice, etc...
* I bought several yards of red, blue, and gold costume satin fabric at Walmart for the table cloths. Instead of confetti, I used craft jewels.
* I wanted to try this ice cream idea from Pinterest and even bought fleur de lis and princess cookie cutters, but again, I ran out of time. Someone will have to try this and tell me how well it turns out.  

Happy party planning! 

Monday, July 2, 2012

Baby Shower Cake: "Welcome to the Nest"


A good friend of mine is expecting her second little girl and the choir threw her a baby shower at church. I think she was a little over the traditional idea that everything for a girl needs to be pastel pink, so I decided to step outside the world of stereotypical baby shower cakes. She likes birds so I decided to do a "Welcome to the Nest" theme. After a quick search on Pinterest, I found this cake and used it as my inspiration. 

Materials needed:
  • 2 Cake mixes of your choice (I used a chocolate Duncan Hines mix.)  
  • Icing (homemade or store bought)
  • 2 boxes of white fondant (You can find this at any craft store.)
  • Gel food coloring (I used Wilton . This works much better than the food coloring drops.)
  • Wilton Nature Fondant and Gum Paste Mold
  • rolling pin or fondant roller
  • 2 round cake pans (6 inch and 8 inch)
  • confectioner's sugar 
  • Roll and cut mat (optional, but helpful)
  • Fondant smoother
  • a cutting tool with a small, sharp blade. (There are special fondant tool kits that you can buy, but I used the cutting kit that came with my Circuit machine. A small knife or an exact-o knife will work, too, if you're on a budget.)
  • Cupcake liners 
  • paintbrush
  • shaping foam (in the cake aisle)
  1. Bake your cake (and cupcakes if desired). I decided to make a small cake surrounded by cupcakes. I used Wilton Color Cups, which I found at JoAnn's (36 for $3.00). The liners are made of foil, so they cook evenly and retain their color while baking. You can even bake them without a cupcake pan.                                                      
  2. Let your cake cool completely before transferring to a working surface. Put the cake on top of something that you can move easily (a cake board, a cookie sheet or thick piece of cardboard covered in tin foil).
  3. Mix your fondant colors. Divide one box into 4 equal parts: pink, green, brown. Add the left over quarter of white fondant to the entire 2nd box of fondant and color it blue. I am a novice at this, so here is a link to a really great website that explains how to color fondant. Be sure to read all of the tips! 
  4. My K-imperfect moment on this cake: I made the mistake of only buying one box of fondant to cover my two tiered cake. So I rolled out the fondant thinly enough to make the circle cover both. If I could do it over, I would have covered each tier individually.
  5. Roll out the fondant. Lightly dust your smooth work surface or the Roll & Cut Mat and your rolling pin with confectioners' sugar to prevent sticking. Roll out fondant sized to your cake. To keep fondant from sticking, lift and move as you roll. Add more confectioners' sugar if needed.
  6. How big does your circle need to be? The diameter (the distance across) + the height of the cake + the height of the cake + 2 inches of wiggle room.  This means that for a cake pan that is 8 inches across and 3 inches high, you would need (8+3+3+2=) a circle that is 16 inches across.   
  7. To move your fondant in one piece, roll it onto your rolling pin and then unroll it over the cake.
  8. Smooth out the fondant with a fondant smoother. This is probably the hardest part.   
  9. Trim away excess fondant and tuck the ends under the cake gently.
  10. Don't worry too much if there are some minor tears or creases in the fondant, especially around the base of the cake. This is a good cake for beginners because there is an easy way to cover these mistakes.

How to make the decorations:

This part is simple, but time consuming. I did this while watching a movie. :-) I didn't finish in one sitting, so I put the pieces that I had finished in a tupperware container until I was ready to decorate.

Use the mold to make the pieces you want (leaves, flowers, branches) by pushing pieces of fondant into the mold. Bend the mold to make the pieces come out and them trim them using your tools. To trim them, I laid them on a piece of shaping foam. (This is optional, but it was nice to have.)
A branch on the shaping foam.


Attach the branches on the cake first. To attach pieces, paint the back of the decoration with water using your (new) paintbrush and press onto the cake. You can use frosting, too, but I thought painting them was easier and I didn't have to worry about excess frosting being smushed out around the decorations. 

The first thing I did was cover any creases or bumps along the sides of the cake. Then add more branches to fill in the gaps. 
The first branches placed to cover the imperfections.

Next, add your flowers and leaves. 

Cover any problem areas first and then fill in the rest.

How to make the bird family:

One of the party hosts had bird napkins that she'd picked up from IKEA, so I modeled the birds (one for each family member) off the napkins. 

1. Roll a ball of fondant into an egg shape in the size that you would like the bird to be. flatten the bottom of the egg so that the bird will stand up.

2. To make the wings, I used the leaf mold and then pinched the end to make it look a bit more pointed. Attach it to the bird with a wet paintbrush.

3. To make the tail, roll out a small rectangle of fondant. Use your cutting tools to add line impints to it to resemble feathers. Attach it to the egg shape in the back with a wet paint brush.

4. Shape tiny eyes and a small beak using leftover fondant. Attach to the face. 

5. To make the nest, make a few brown fondant branches using the mold. Twist them into a nest shape. For the egg you can just roll a small piece of fondant into an egg shape, or use egg shaped candies. Jordan almonds would work well, too, but I didn't want to pay $7.00 for the bag.

  
Overall, I think it turned out very well considering it was only my 2nd time using fondant. Don't refrigerate the cake because the moisture will make the fondant sticky.  


Extra tips and suggestions:

  • Use the 40% off coupons to craft stores like Michael's or Hobby Lobby to buy the mold, fondant, and any of the other higher priced items needed to work with fondant.
  • If there is a step you don't quite understand, google it. Chances are good that you will find several links and youtube video tutorials that will help you. 
  • I love some of the specialty cakes from Publix, like vanilla with strawberry cream filling, that I have a hard time recreating. You can always order an undecorated cake and add the decorations yourself. 
  • If you want to make your cake in advance, you can freeze it. Just cover it in saran wrap and, for extra measure, tin foil. De-thaw it to room temperature before decorating. 
  • For a really moist, thicker cake I always prepare my cake mix with: 4 eggs, 1 (3.4 oz.) package of instant pudding, 1 1/4 Cups of water, and  1/2 cup of oil to prepare the mix. Add approx. 15 minutes to the listed baking time. (Note: this works really well on chocolate cakes.)   
  • Wrap your cake board in wrapping paper that matches your cake if you don't have a pretty platter or cake stand to display it on. 
  • If you're making a large version of this cake, follow these rules for stacking a cake.
  • This is a link to a chart for the amount of fondant needed to cover other shaped/sized cakes. I think they over estimate the amount of fondant needed, but that couldn't possibly be because they are trying to sell you something, right? 

Saturday, April 14, 2012

Why do I do it?

My son does not have a baby book. 

He has a baby book, a wall calendar recapping the major moments of each month, 2 enormous 12x12 scrapbooks that capture every major event from my pregnancy to his first birthday, and this photo growth chart chronicling his first year.  


When I signed up to bring fruit kabobs for my son's Fall party at school, I didn't bring in a pile of fruit on sticks.

I whipped out my drill & the box of Mr. Potato Head parts.


This year at Christmas, I signed up to bring in cookies for the class party. In my book, this doesn't mean bring in a package of Oreos. 

They got personalized gingerbread boy and girl cookies.

(I won't even get started on the things I have already done/made for my daughter.)

The big question that occurs to me when I am recreating valentines from Pinterest at 11:20 p.m. or closing in on my 2nd hour of frosting a birthday cake when I am 39.4 weeks pregnant is simple:

WHY AM I DOING THIS?!?!

It would be easier to buy something cute off of Etsy instead of figuring out how to make ruffle pants for my daughter. It would take a lot less time to order a cake from Publix than make one myself. I realize this. And yet, most of the time, convenience doesn't win. 

Here is why:

1. I like to make things. More importantly, I have a need for things to be pretty. 

2. Nature and nurture: My projects in school were usually amazing, thanks to my mom. My 2nd grade teacher sent us home with a template of a turkey that we were supposed to decorate and bring back to school. Most people came back with popcorn kernels and macaroni glued to their turkey. Mine looked like Abraham Lincoln, complete with a hat and a gold pocket watch. I was raised to do my best and think outside of the box, or as my fellow teachers would say, "Exceed the standard". I want to pass this on to my kids. 

3. I like to save money. Learning how to make ruffle pants or pillow case dresses for the price of fabric and thread saves me roughly $20 every time I want one for Emily. 

4. The little things matter to people, especially kids. The gingerbread cookies above were a huge hit with the 4 year olds. When I unveiled my son's 3D race car birthday cake that I had made for him, it literally took his breath away. 
I will never forget the look on his face. 
     Kids see the time you spend doing something for them and (if you do it joyfully) they appreciate it. I also try to take the opportunity to teach them how important it is to do things for other people. Letting Jacob help me bake the cake we're taking to a friend who just had a baby is more meaningful than grabbing one at the supermarket. 

5. I'm not just making cakes and costumes. I'm making memories. Sometimes they are for other people, but they are also for me. One day I won't remember any of the silly things my kids say on a daily basis or how cute they looked playing together in the sandbox for the first time. And neither will they. At least, not without my scrapbooks. :)

6. I am a teacher. I post my stuff on facebook or this blog to let people see what I can do and be inspired. I love it when people come to me for advice on something they want to learn to make. The best comment I had on one of my creations was "I am totally stealing this!" Almost everything is easier than it looks. 

   For example, here is the race car cake that I made:
 It uses one frosting tip for the entire cake. One.

This is a Winnie The Pooh cake I made for a baby shower.
   It used two different frosting tips. Two. Seriously, with the right cake pan, a box of Duncan Hines, and a pastry bag, you can do this! 

7. Affirmation. I've saved this one for last because it is more of a bi-product than a reason. The older I get, the less important it is for me to hear the virtual applause of my facebook friends. I don't put all of my projects up for display. But if I am totally honest, I can admit that I still enjoy seeing people like something that I have spent a lot of time on. I don't think there is anything fundamentally wrong with that, as long as it isn't what drives you. 

Five or 10 years ago, the honest answer to the question, "Why am I doing this?" would probably have been "Because I want to be the best", rather than wanting to give my best. 

Ahh, the lessons of motherhood. It is only a competition if you make it one.